To start with I need to make the pocket flaps, which need to be lined and piped before setting.
At first glance they are a very simple design – just a simple rectangle that will be sewn in place – but there are a couple of tricks I need to use to make sure they sit nicely and stay that way after the coat is finished. It may seem like I am making a mountain out of a molehill – how difficult can it be to sew a pocket flap? – but done properly they will look great; done badly they will look awful.
The main problem to overcome is the curvature of the body of the coat. If I just make flat pocket flaps and sew them in place, the curve of the body will pull on the fabric. The topside of the flap when then have to span a fractionally longer distance than the underside, and this will cause the corners to curl up and away from the coat. This may not be immediately noticeable when the coat is made, but as things setting down it could become more pronounced.
 I will use a simple trick to stop this, based on how I make Lapels And Collars sit nicely.
Once I have interfaced the topside of the flap, and cut a piece of lining to match, I pin them together with four pins, one at each corner. The are positioned with their points towards the corners, and are pinned specifically from the lining side. This makes the corners curl upwards (see right, top) and will counter the pull I described earlier.
I can then sew them together, from the lining side with pins on top. Usually you remove the pins as they get closer to the needle, but to sew the curl into the flap I need to leave them in place (see right, middle).
This is why I put the pins with points towards the corners, so if I accidentally pit the pins with the needle, they will cause minimum damage compared to hitting a pinhead.
I then need to carefully clip the corners to prevent bulking at the points, but leave a little more than usual becasue of the delicate nature of the silk lining (see right, bottom).
Once the pocket flap is turned right-side out and pressed, it has a natural tendency to curl at the corners, but in the direction I want them to (see below).

Time now to pipe the edges.
When I did the Calico Test Coat I needed to make it fairly quickly. I therefore cut a few corners here and there, knowing I would do them more carefully when I did the finished coat. Piping was one thing I needed to make short work of.
 I therefore machine stitched the vast bulk of it, with the expectation of needing to hand stitch it all later. However, the results were surprisingly good and I found I could machine a majority of the long straight runs, and hand stitch just the details such as ends and changes of direction. These details give the impression of hand stitching throughout.
So, to pipe the flap I first wrap the piping around the long bottom edge, making sure it is perfectly lined up above and below. I can then stitch, starting and stopping around an inch from the corner (see left, top).
Once this piece is secured in place (see left, middle) I can the do the same on the sides, gently bending the piping around the corner.
The piping then has a bulge (see left, bottom) which I can hand stitch together to make a nice neat corner.
The finished flap, ready for setting, still has its nice curl (see below).

The flaps are then sew in place along the line of the waist seam of the coat (see below). I need to be careful of the level I am sewing to, as later on this will form the datum for the waistline seam.
 The pockets need to be positioned surprisingly far around the body. When I made the Calico Test I found I had placed them too far forward, with the flap not as big as it needed to be. All of this has been fixed for the final version, proving the importance of producing a sample garment before launching into the real thing.
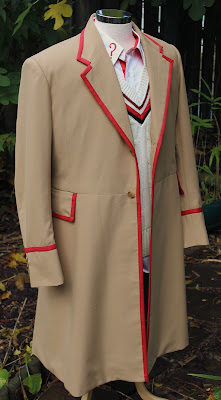
 At this point, with the sleeves set and the pockets flaps with the piping in place, the coat starts to take some recognizable shape (see right).
The final assembly of the outer pockets is a little unusual – at first glance quite simple – but surprisingly difficult to execute in practice.
Pop back soon to see how I get on.


No comments:
Post a Comment
Note: only a member of this blog may post a comment.